This chapter contains the following topics:
|
Note |
This chapter no longer applies for PBS v12.01 and after, as the PowerTools lookups are no longer being used in PBS. If you have a version earlier than 12.01, then lookup design still applies. In 12.01 and later the lookup screen has a "More info" button which allows users to access almost all the data from the file / table being accessed by the lookup. Rights to access the "More info" screen is determined by the users login and assigned menu. Some lookups provide access to master files where you can add, edit, delete records or simply view records. Those are indicated by the matching menu name. For example, on the vendor lookup there is a button called Vendors. |
There are hundreds of fields throughout Passport Business Solutions where Lookups can be accessed. Some of these fields have multiple Lookups. The Lookup features for the PBS user are explained in the System User documentation. This chapter explains the Lookup Maintenance features that can be used by a PBS administrator to design Lookups.
The lookups provide a new realm of possibilities for customization. The Lookup Maintenance function (Lookup Editor) allows a Passport Business Solutions Administrative User to customize Lookup Windows without source code. General Users can not utilize these features.
With the use of Lookup Maintenance you have opportunities to access the data that you need. There are different Lookup functions that help you achieve the result.
| • | Add, change or delete one of the columns in the Lookup |
| • | Create or copy a new Lookup and then modify it |
| • | Assign a Lookup to a PBS user |
| • | Assign a Lookup to a PBS program |
| • | Assign a default sort-by for the lookup or limit the available sort-by fields |
In the Windows Passport Business Solutions with the Lookups you have the choice of using either the Windows-based or the character-based lookups. In the UNIX or Linux Passport Business Solutions versions, you can only use the character-based ones. In either case, you have the power to customize the lookups as needed. The user functions of the Lookup are documented in the System User documentation.
Multiple Lookups can be linked together to form a Linked Format Group. There are many examples of Linked Format Groups in PBS. The user accesses other Lookups in the group using the Next Lookup button.
A Passport Business Solutions Administrator user accesses the Lookup Maintenance function by pressing <F7> from any lookup in Passport Business Solutions. To return to the functioning Lookup press <Esc>.
By default the Lookup Maintenance function displays the lookup parameters for the Lookup that was active when the <F7> was pressed. Each Lookup record in the Lookup Maintenance function corresponds to the parameters (or attributes) of one Lookup Window. Passport Business Solutions General users cannot access Lookup Maintenance.
Select
A Lookup from any PBS screen with the <F8> key. To access the Lookup Maintenance window select the <F7> key.
|
Note |
In most cases, there is a Lookup on the field where you need it. But in the case where you have to create access to a Lookup you must do this in Lookup Access Maintenance (different than Lookup Maintenance). See the Appendix Adding a Lookup on how this is done. |
When you first view the Lookup Maintenance window it displays the parameters for the Lookup that was last active and the cursor is at Field number to change ?.
The Lookup Maintenance Window is divided into two sections.
The upper section of the window, down to field 21, is the master or header data Lookup parameters. Fields 1, 3, 4 and 5 comprise the key field in the file and can only be changed if you are entering a new Lookup or you have copied a Lookup and you are editing it.
In the upper left corner the Path is displayed. This relates to where the Lookup file is stored on the system. There is more information on the path and the relationship of the path to saving and deleting Lookups later in this chapter.
Field 3 through 8 comprise the Linked Format Group fields. These are used in linking the Lookups together forming a group. The next lookup in the group is accessed by the user using the Next Lookup button or the <F4> key. The last Lookup Format is linked to the first forming a loop.
The lower section controls the Lookup column titles and fields that display.
Fields 10 through 12 and the third row of field 22 pertain to the Character-based lookups only. All the other fields pertain to both the Windows-based and Character-based types.
There are several functions that you can do when viewing the displayed active window.
Options
You may use one of the options:
|
Enter a field # at FTNC |
To modify an existing Lookup field from Field number to change ?. |
|
<SF8> |
To view the Field Lookup which is a list of the available fields along with the field numbers that can be used in the Lookup |
|
<F7> |
to remove the current Lookup from memory. This results in a blank record with no fields filled-in. After selecting ESC there are some additional options (see below) |
After you select the <F7> key you have several other options for selecting a Lookup.
Options
You may use one of the options:
|
<F1> |
Select the next Lookup program |
|
<SF1> |
Select the previous Lookup program |
|
<F3> |
To delete the Lookup |
|
<SF8> |
This displays a Lookup of all the Lookup records in PBS. You can use the mouse or arrow keys to select a find and highlight a Lookup. When the Lookup is located select the <Enter> key (or Mouse click in Windows) and it will display in the Lookup Maintenance window. |
|
<C> |
To Copy the Lookup. Once the Lookup is copied, you can modify it and save it. |
If you have modified or copied and added a Lookup, there are several save options. These are documented later in this chapter.
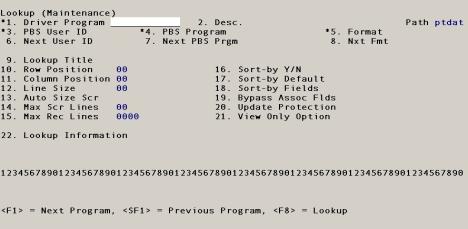
To view the Lookup Maintenance window with no data entered select the <F7> and then the <Ecs> key and you will see a window similar to this:
*1. Driver Program
Enter the Driver Program name.
This must be an existing valid driver name.
|
Format |
12 characters, Normally this is module prefix (2), application (6), “.”, application suffix (3). |
|
Example |
Type apvenfil.scr |
You can view all the available driver names from this field by selecting the <F8> key.
You will see a screen like the following:
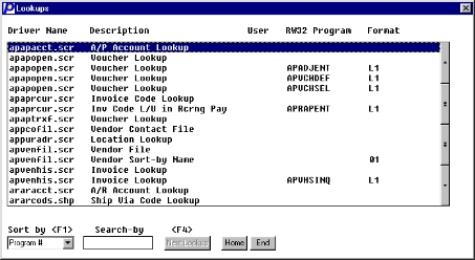
This is itself a Lookup and functions accordingly. The columns in this Lookup are described below.
|
Column |
Description |
|
Driver name |
These are the available names you can use. |
|
Description |
This is the description of the driver. |
|
User |
If the Lookup is assigned to a PBS user, this column will have data. If the Lookup has not been assigned to a user this column will be blank. More information on assigning a Lookup to a user is found later in this chapter. |
|
PBS program |
If the Lookup has been assigned to a specific PBS program, the program name will display. For a list of PBS programs, see the Appendix in this chapter. |
|
Format |
This is the Lookup format. The use of the format field is provided later in this chapter. |
*2. Program description
Enter a description of the Lookup.
|
Format |
25 characters |
|
Example |
A/P Vendor File - If this lookup is assigned to a user or PBS program you could also include a reference that is appropriate, like A/P Vendor-Mary. |
*3. PBS User ID
Enter a valid Passport Business Solutions user ID.
This assigns a Lookup so that it “belongs” to a specific user. This field should be left blank if you do not want to assign the Lookup to a User.
When a User ID has been assigned to a lookup it takes preference over any general lookups that have been assigned without a User ID.
|
Format |
5 characters - Currently PBS only allows 3 character User ID’s. |
|
Example |
PSI |
|
Note |
In the Custom Forms, User IDs and PBS Programs section later in this chapter there is an explanation of the relationship between the PBS User ID field and the Next User ID field. |
4. PBS Program
Enter the name of the Passport Business Solutions program that calls this lookup.
This allows you to create a lookup that is unique to that Passport Business Solutions program. You should only fill in this field if you want to assign the Lookup to a specific field in PBS. Leaving the field blank will mean that the Lookup can be accessed in all the locations where the Lookup has been set up. You must know the program name before you can do this assignment.
For example by making a specific entry for APVENMNT (Vendors-Enter) you could create a Vendor Lookup that is designed specifically for Vendor Maintenance. Consequently the Vendor Lookup in Voucher entry and Open Item Query would remain as the ‘standard’ Lookup.
|
Format |
12 characters |
|
Example |
Select <Enter> |
|
Note |
In the appendix PBS Menu and Program Names, you will find a spreadsheet that indicates the program names that are linked to the Passport Business Solutions menu selections. Use this information to help you set up the PBS Program field. |
|
Note |
In the Custom Forms, User IDs and PBS Programs section later in this chapter there is an explanation of the relationship between the PBS Program field and the Next PBS Prgm field. |
5. Format #
Enter the Format layout number.
At any one PBS field, where Lookups are accessed, there may be multiple Formats. One format can be different from another by having different columns, different sort-by and a number of other Lookup parameters.
Each Lookup is a different Format and a group of Lookup Formats can be linked together. This field is used, along with the Next Format field, to Link together Lookup Formats. In a group each Format number must be unique.
When Lookups are linked together in a group the user can click on the Next Lookup button or select <F4> to display the next Lookup Format.
With a unique Format number for each Lookup, Lookups will have the same Program name and when they are linked to the same originating field. The result is multiple Layout windows with different contents that can be accessible from the same field.
What you enter on the Format # field works in relationship to the entry on the Nxt Fmt (next format) field. Read the explanation of the Nxt Fmt field to understand the relationship between these two.
|
Format |
12 characters |
|
Example |
Select <Enter> |
|
Note |
The Format numbers, L1, L2 etc., can be the same for different Lookup Format groups |
6. Next user ID
Enter the Passport Business Solutions User ID for the next Lookup in this loop.
If a Lookup is assigned to the user, then all user ID’s in one Linked group should be the same.
|
Format |
5 characters, but PBS only allows 3 character User ID’s. |
|
Example |
Select <Enter> |
7. Next PBS Prgm
Enter the Passport Business Solutions Program name for the next Lookup in this loop.
If a Lookup is assigned to the PBS program, then all Next Program names in one Linked group should be the same.
|
Format |
12 characters |
|
Example |
Select <Enter> |
8. Next Fmt
Enter the Format number for the next Lookup in the Linked group.
|
Format |
12 characters |
|
Example |
Select <Enter> |
You only need to enter a value in this field if you have multiple formats for the group.
|
Note |
When making Lookup groups into loops, you should link the last Lookup back to the first. This is not a technical requirement. You can break the loop and link to a Lookup that is part of another chain, however there is no provision to allow you to return to the loop you started in. |
When it comes to Linking the last Lookup to the first, the PBS installed Lookups, as opposed to adding a custom group of Lookups, have a different Next format convention.
Here is an example of how the Format and Next format fields are entered with the PBS installed Lookups. You can add a custom Lookup Format to the end of this group as long as you use the three dashes in the Next format field.
|
PBS Installed Lookup Group Order |
Format |
Next Format |
|
1 |
|
01 |
|
2 |
01 |
02 |
|
3 |
02 |
03 |
|
4 |
03 |
--- |
The first format links to the second, the second to the third, third to the fourth and the forth format links back to the first.
Here is an example of how a custom group of Lookups should be entered.
|
All Custom Lookup Group Order |
Format |
Next Format |
|
1 |
L1 |
L2 |
|
2 |
L2 |
L3 |
|
3 |
L3 |
L4 |
|
4 |
L4 |
L1 |
Because the field is 12 characters you can theoretically have billions of formats linked together. So, there is no ‘practical’ limit on how many custom Formats you can link. If you need more than 10 formats in a group, enter the first as L01, the second as L02 and so on.
9. Lookup Title
Enter a descriptive title for the lookup.
This Lookup Title description displays in the title bar of the Lookup Window.
|
Format |
60 characters |
|
Example |
Vendor Lookup Including Vendor YTD Purchases |
10. Row Position
This field only applies when the Lookups are running in Character Mode - in Windows a separate window is opened so this does not apply.
Enter the row offset of the Lookup window box. This is the number of lines skipped from the top of the screen to display the lookup window box.
The value is numeric that can be between 0 and 21 giving the number of rows down that the window box will be drawn.
|
Format |
2 numeric |
|
Example |
05 |
11. Column Position
This field only applies when the Lookups are running in Character Mode. In Windows Mode the width is automatically calculated so this field does not apply.
Enter the column position of the Lookup window box. This is the number of columns from the left where you want the lookup window box to be displayed.
The maximum width of a column is 78. The value is a numeric and can be between 2 and 77 giving the number of columns across that the window box will be drawn.
|
Format |
2 numeric |
|
Example |
02 |
12. Line Size
Enter the Lookup window width that will display on the screen.
The maximum size is 78. This numeric value should be between 3 and 78 giving the width of the window box.
|
Format |
2 numeric |
|
Example |
02 |
|
Note |
The total value of Column Position and Line Size cannot exceed 80.
|
13. Auto Size Scr
Enter the Auto Size Screen flag.
This field is used to determine if you want to automatically size the lookup. The value Y will auto size and N will not. This field will override Line Size.
If the number of records being displayed is less than the number of records in Max Scr Lines, the Lookup will automatically be sized based on the width requirements of the displayed fields and the number of displayed records.
|
Format |
1 alphanumeric, either Y or N |
|
Example |
Y |
14. Max Scr Lines
Enter the maximum number of lines to be displayed on the screen.
This parameter determines the height of the Lookup Window.
|
Format |
9(2) numeric; a value between 12 and 24 |
|
Example |
16 |
15. Max Record Lines
Enter the maximum number of records to be read into memory at one time.
Many PBS files can contain hundreds, thousands or more records. A Lookup program puts records in RAM memory. If the Lookups were to put thousands of records in memory at one time, the performance would be very slow. Therefore we have provided a means of limiting the number of read records.
There are two ways of changing the number of records that are being read. You can enter a value in this field or change the global COBOL Configuration File (cblconfi in Windows and cblconfig in UNIX/Linux) value. When the Max Record Lines is set to a value of 9999 then the Configuration file determines the number of read records. With any value between 10 and 1000 then the Max Record Lines field determines the number of read records.
The maximum that can be entered is 1000. If the Lookups are being used on a slow performance machine or network, lowering this number will increase the performance.
Also lowering the global value in the Configuration file will produce the same results. But because that is a global value it effects every file Lookup for every user on the PBS system. See the information on setting the global value see the SET_POP_SZ field in COBOL Configuration File appendix.
|
Format |
Numeric; a value between 10 and 1000 |
|
Example |
9999 |
16. Sort-by Y/N
Enter Y if you want to allow multiple sort-by fields and N if you do not.
Most PBS files have multiple sort-by fields. but some may not. Check the Field Lookup (F7) to determine if it is available.
If you enter Y the Sort-by field on the Lookup will be accessible. If you enter N then the Sort-by field will be grayed-out and not accessible.
|
Format |
1 Alphanumeric: Y or N |
|
Example |
Y |
17. Sort by Default
Enter the default Sort-by field number (letter).
A Sort-by must be an Indexed field within the PBS COBOL file. To view the available Indexed fields press <F7> to display the Field Layout. The available fields will be indicated by the term Primary Index or Alternate Index. Up to 15 Index/Sort-by fields can be available depending on the index structure of the primary file.
Valid entries include 1-9 for fields 1-9 and A-F for fields 10-15. If this field is set to spaces, an “N” or a zero the program will default to using index #1. Other values will give invalid results and may partially disable the Lookup.
|
Format |
1 Alphanumeric; 1 - 9 and A - F |
|
Example |
1 |
|
Note |
For some files the Valid G/L Account number or G/L Chart of Account number may be listed as an Alternate index field in the File Layout, but it is not available as a Sort-by and therefore cannot be used. It is only available when it is the Primary Index like in the Valid G/L Account file. |
18. Sort-by Fields
Enter the Sort-by fields to be used for this lookup.
There are default Sort-by fields that are dictated in the program and files. Entering data in Sort-by Fields will override these default Sort-by fields. Leaving Sort-by Fields blank will use the default.
These entries must be entered as a string separated by commas. Valid entries here are 1-9 for fields 1-9 and A-F for fields 10-15.
Acceptable values include “1”-“9” or “A” to “F” for each entry in the string. The actual values that are valid will depend on the actual indexes available through the program.
|
Format |
10 Alphanumeric |
|
Example |
1,2,4,A,C |
19. Bypass Assoc Flds
Enter Y if you do not want to access the associated fields. Enter N if you want to use the associated fields.
There are two types of fields that a Lookup can access. These are the Primary file fields and an Associated file fields. The Primary file fields are from the main file and are always available. The Associated fields come from an Associated file that is linked to the Primary file. Multiple Associated files can be linked to a Primary file. Not all Lookups will have Associated fields.
For example, the Customers Lookup has fields from the Primary Customer file, but it also has fields from the Associated Sales Rep file. The Sales rep name is not part of the Customer file, but you can select it as an Associated field and then it will display in the Lookup. At the end of this chapter is a list of the Primary and Associated files.
Answering Y to Bypass the Associated fields will increase lookup performance since all the Input and Output that accompanies the synchronization process will be bypassed. In most cases the Lookups are defaulted to Y.
Selecting <F7> for the Field Lookup will give you a list of the Primary file fields and further down the list, the Associated file fields.
|
Format |
1 Alphanumeric, Y or N |
|
Example |
N |
20. Update protection
Enter Y if you want protect this Lookup or select N if it is OK to over-write it when PSI applies updates.
|
Format |
1 Alphanumeric, either Y or N |
|
Example |
N |
This field will automatically get set to Y when you modify or create a new Lookup.
21. View only option
Enter Y if you want this lookup to be view only or select N if you want sort-by, search and next Lookup options to display.
|
Format |
1 Alphanumeric, either Y or N |
|
Example |
N |
22. Lookup Information
Enter the three Lookup display lines.
Be aware when entering the header, data fields and column separators, you should allow room on the column to be able to view the data; otherwise the displayed data will be right-truncated. A right-truncation may be fine if you do not need to see the entire field. The field length is noted in the Field Lookup.
Line one (Header)
Enter the field names on the first (header) line. These names will display in the Lookup as the column heading.
|
Format |
78 Alphanumeric |
|
Example |
Vendor # Vendor Name Email 1 |
Place an @ symbol before each column heading if you want to use proportional fonts.
Line two (File Data)
Enter the data field numbers, prefaced by the caret <^> symbol or a number <#> symbol.
The caret symbol has special meaning and indicates that the 1-3 character code after the caret is not just alphanumeric data but is a field number and the field contents are to be placed where the caret is located.
To make the data easier to read when using a proportional font, the number symbol is used in place of the caret for all numeric fields that have numbers to the right of the decimal. This will justify the decimal point and will right justify the column header as well.
The field numbers can be found in the left column of the Field Lookup. If the number in the Lookup is 001, then enter ^1
|
Format |
78 Alphanumeric |
|
Example |
^1 ^2 ^121 |
Line three (Column separator)
Enter a | or + symbol.
This row is used for the field separator symbols and is needed only when designing a character lookup.
The pipe <|> symbol will draw vertical lines separating each column. The plus <+> symbol will display the lookup as a grid and draw a full row and column grid so that each data element appears to be surrounded by a box.
|
Format |
78 either |or + |
|
Example |
| |
Field number to change ?
Once you have copied or changed a Lookup and you are ready to save it you have several options. The PBS Lookups will allow you to save the changes so that they are global or company specific.
There are some differences at Field number to Change from the standard PBS convention.
When you select the <Enter> key, the Lookup record Format will continue to display but with some differences on the second row of Field 22. Depending on the type of field you entered the following will be indicated.
| • | Alphanumeric fields will display as X’s |
| • | Numeric fields will display as 9’s |
| • | Dates will display as 99/99/99 |
As a confirmation on what you entered, you can review field 22 to verify that the Header line, File data line and, if used, Column Separators line up properly. If you entered a non-valid field number, then the field will not display.
Options
When you select <Enter> the second time you have the following options:
|
Create/update company specific Lookup? |
Select Y to create a company specific record or select N to not do so. If you select Y, the Lookup gets saved in ptxx.
The first time you save a Lookup for a company, this will create the directory and needed files. Therefore you must have permission on your system to create a directory and a file. |
|
Create/update global lookup? |
Select Y to create a global custom Lookup record or select N to not save the record. If you select Y, the Lookup gets saved in ptcus.
You can also select the Esc key and no changes will be saved. You will be returned to the Lookup but the changes will be removed. |
When you select to create and save a global Lookup the Lookup will function in every PBS company in the system. If you create and save a Company specific Lookup, then the Lookup will only work for the company you are in at the time you create it.
In the upper right corner of the window the word “Path” displays. Next to this word is the directory where the file Lookup record is stored. These locations relate to the access of the Lookups. Here are the directories and description.
|
ptdat |
This is where all the original non-customized lookups are stored. When you customize a Lookup in ptdat and save it, it gets saved in either ptcus or ptxx. |
|
ptcus |
This means that you are viewing a global customized Lookup. |
|
ptxx |
This indicates that you are viewing a Lookup specific to a PBS company. The xx represents the company number. |
You can only delete customized Lookups. You cannot delete the original Lookups that were supplied with the PBS installation.
You can delete a Lookup from any location in PBS where a Lookup can be accessed, but it is often easier to find the Lookup from the field where it is accessed.
Here are the steps to delete a Lookup.
| 1. | Navigate to the field where you can access the Lookup and display it with <F8>. |
| 2. | Select <F7> to display the Lookup Maintenance Window. The Lookup should either display the path as ptcus or ptxx. If it is ptdat, then you do not have a custom Lookup and it can not be deleted. Note the driver name and any other identifying information about the Lookup. |
| 3. | Select <Esc> and then select <F8> for a list of the Lookups. |
| 4. | Find the one from the list that matches the one you want to delete and select it. |
| 5. | The Lookup record should display in Lookup Maintenance. Select <F3> to delete it. |
| 6. | To test that it is deleted, exit out of Lookup Maintenance, exit the Lookup and reselect the Lookup with <F8>. |
The program determines the hierarchical sequence of which specific Lookup that is accessed, based on what as been entered in the Lookup record. The sequence determines who, where and which Lookup Format that is accessed and then displayed.
There are several fields in the Lookup that determine this sequence. These fields include the PBS User ID (who), PBS Program (where) and Format.
The general scheme is to go from most specific to least specific. Assuming that you are using the L1, L2 and so on as the convention for naming the formats, when a Lookup is accessed using the <F8> key the following sequence applies.
The program will first check to see if data exists in the User ID field, then Program Name field and then for a Format of L1.
It will then check to see if a Lookup is available for the User ID and a Format of L1.
Then it will check for a Lookup for the Program Name and a Format of L1.
Then it will check for a format of L1.
Finally, if none are found, it will go to the default Lookup specified for that Driver Program in the Map Configuration.
You will need to keep this hierarchical sequence in mind when developing, modifying and assigning your lookups.
You can assign a user, program or both to a custom group of Lookup formats.
When you assign a user to a group it means that only one PBS user will access the group of Lookups.
Here is an example of entering the Format and User ID fields when assigning a User to a multiple Lookup formats.
|
Lookup Group Order |
Format |
Next Format |
PBS User ID |
Next User ID |
|
1 |
L1 |
L2 |
PSI |
PSI |
|
2 |
L2 |
L3 |
PSI |
PSI |
|
3 |
L3 |
L1 |
PSI |
PSI |
In the above example, we have multiple formats. If you need only one format for the user, then you can leave the Next format and Next User ID fields blank.
You can also assign a PBS program to a Lookup format. Here is an example of assigning a group of Lookup formats in O/E, Orders on the customer number field.
|
Driver Program |
Format |
Next Format |
PBS Prgm |
Next PBS Prgm |
|
arcusfil.scr |
L1 |
L2 |
OEORDENT |
OEORDENT |
|
arcusfil.scr |
L2 |
L1 |
OEORDENT |
OEORDENT |
You can assign multiple or single custom formats to both a User and a Program at the same time.
The following contains a list of the primary files and their associated files.
|
Module |
Primary File |
Assoc. File |
Assoc. File |
Assoc. File |
Assoc. File |
Assoc. File |
Assoc. File |
Assoc. File |
|
AP |
APACCT |
ACCTFI |
|
|
|
|
|
|
|
AP |
APOPEN |
VENFIL |
|
|
|
|
|
|
|
AP |
APRCUR |
VENFIL |
ACCTFI |
|
|
|
|
|
|
AP |
APTRXF |
VENFIL |
|
|
|
|
|
|
|
AP |
PURADR |
VENFIL |
|
|
|
|
|
|
|
AP |
VENFIL |
ACCTFI |
|
|
|
|
|
|
|
AP |
VENHIS |
VENFIL |
|
|
|
|
|
|
|
AR |
ARACCT |
ACCTFI |
|
|
|
|
|
|
|
AR |
ARCODS |
ACCTFI |
|
|
|
|
|
|
|
AR |
AROPEN |
CUSFIL |
SLMFIL |
ARCODS |
|
|
|
|
|
AR |
ARRCUR |
CUSFIL |
SLMFIL |
ARCODS |
|
|
|
|
|
AR |
CUHFIL |
CUSFIL |
|
|
|
|
|
|
|
AR |
CUSFIL |
SLMFIL |
ARCODS |
ACCTFI |
|
|
|
|
|
AR |
DLVFIL |
CUSFIL |
|
|
|
|
|
|
|
AR |
IVCSTA |
IVCFMT |
|
|
|
|
|
|
|
AR |
PIHDRF |
CUSFIL |
SLMFIL |
ARCODS |
DLVFIL |
JCMSTFI |
|
|
|
AR |
RHDRFI |
CUSFIL |
SLMFIL |
ARCODS |
DLVFIL |
JCMSTFI |
|
|
|
CR |
CKACCT |
ACCTFI |
|
|
|
|
|
|
|
IC |
CATEGF |
ACCTFI |
|
|
|
|
|
|
|
IC |
ICTRKF |
CUSFIL |
ITMFIL |
SERHIS |
POHDRF |
|
|
|
|
IC |
INVACT |
ACCTFI |
|
|
|
|
|
|
|
IC |
ITMFIL |
ACCTFI |
VENFIL |
CATEGF |
SUBCAT |
ICCODS |
UNITFI |
STATFI |
|
IC |
KITFIL |
ITMFIL |
|
|
|
|
|
|
|
IC |
SERHIS |
CUSFIL |
ITMFIL |
ICTRKF |
POHDRF |
|
|
|
|
IC |
STAFIL |
ITMFIL |
WHSFIL |
|
|
|
|
|
|
IC |
SUBCAT |
CATEGF |
|
|
|
|
|
|
|
IC |
WKOFIL |
ACCTFI |
KITFIL |
WHSFIL |
ITMFIL |
|
|
|
|
JC |
CATFIL |
VENFIL |
|
|
|
|
|
|
|
OE |
OERHDR |
CUSFIL |
SLMFIL |
ARCODS |
DLVFIL |
WHSFIL |
|
|
|
OE |
ORDHDR |
CUSFIL |
SLMFIL |
ARCODS |
DLVFIL |
WHSFIL |
|
|
|
OE |
HDRTRP |
VENFIL |
POHDRF |
PURADR |
WHSFIL |
|
|
|
|
PO |
POHDRF |
VENFIL |
RCVTRX |
PURADR |
WHSFIL |
AUXFIL |
|
|
|
PO |
POLINF |
VENFIL |
|
|
|
|
|
|
|
PO |
RCVHIS |
VENFIL |
WHSFIL |
|
|
|
|
|
|
PO |
RCVTRX |
VENFIL |
WHSFIL |
POHDRF |
|
|
|
|
|
PO |
VENITM |
VENFIL |
ITMFIL |
|
|
|
|
|
|
PR |
DEDCOD |
ACCTFI |
|
|
|
|
|
|
|
PR |
EMPFIL |
DEDCOD |
TAXCOD |
|
|
|
|
|
|
PR |
TAXCOD |
ACCTFI |
|
|
|
|
|
|
|
SY |
CSHACT |
ACCTFI |
|
|
|
|
|
|
|
SY |
SYUSRFIL |
SYUSRACC |
|
|
|
|
|
|
Normally the customized global Lookups get saved in a file in the ptcus directory. But if needed you can have multiple global Lookup directories by adding a parameter in the cblconfi (Windows/Thin-Client or cblconfig (Unix/Linux) file.
Add the following parameter:
USE_PTOOLS_DIR
The first two characters of ‘pt’ are assumed. Therefore if you want to save the global Lookups to the ptpsi directory, the parameter and setting would be:
USE_PTOOLS_DIR psi
There is a setting in the cblconfi file that determines the initial focus of the cursor when you access a Lookup. This setting is
SET_POP_SEL_CTRL
The default setting when PBS is installed is Line. You have the option of the initial focus being the first line, the sort-by field, the search by field or an auto function.
The auto function will bring the cursor to the first line if you have less than or exactly enough lines to fit in the Window. If there are more lines than will fit, the focus goes to the search by field.
The following is the cursor focus section from the cblconfi file:
# LOOKUP FOCUS
# Lookup focus options include:
# LINE = First line,
# INDEX = Sort-by
# SEARCH = Search field
# AUTO = Depends on number of records
SET_POP_SEL_CTRL LINE
Only the first letter of each choice is the indicator of the type.